

By Peter L. Phillipson, Technical Sales Manager (IR), B-TEC Systems
Scottsdale, Arizona — April 6, 2017 — One of the most common application questions I get asked is with regards to body filler and how to avoid possible slip-ups that can end up in redone work, costing the shop time and money.
To begin, let’s first establish what body filler is and why it can cause problems if not treated correctly. The main ingredients in most (but not all) body fillers are talc (baby powder), fibreglass resin and styrene. The hardener contains methyl ethyl ketone peroxide (MEKP). This is not good stuff to get in your body either via inhalation of fumes or dust from sanding. Do not get that stuff anywhere near your eyes. It can cause blindness in seconds, so there’s little chance for an eye wash in time.
Another point to note is that the talc in body filler is hygroscopic, meaning it readily absorbs water. Don’t leave a vehicle in damp conditions with exposed body filler. Moisture could get absorbed and give you big problems later in the repair.
Body filler is exothermic, meaning it creates its own heat when curing. You can actually feel the heat coming off it when it’s curing on the panel. It’s therefore important that it’s not applied in temperatures lower than 15.5º C (60º F ). There are major downsides to low-temperature application. First, the chemical reaction slows significantly. Getting it fully cured and ready to sand could take hours. Second, if the ambient temperature is really low, the temperature of the metal panel is most likely lower still. In these cases the potential of creating condensation under the filler is very real.
One of the common mistakes made with body filler is incorrect mixing of the hardener. I know there are some good mixing products out there, but many users will be just going with a pot of body filler and a tube of hardener.
The mixing ratios are really quite fine-tuned. For example, you’ll see directions like 100-to-3, or 50-to-1. Judging that by eye can be quite a challenge!
There are a few suggestions to make mixing easier. You can squeeze out a line of hardener about two-thirds of the way across a glob of fill about the size of a pancake or a cow pat if you prefer. Most people prefer pancakes, but I’m not here to judge.
Another approximate ratio I was shown was that of the golf ball (filler) and small garden pea (hardener). These aren’t very scientific, but they worked for me.
Too much hardener will lead to over-catalyzation. This is sometimes done on purpose, especially in cold weather or if the tech is under pressure to get a job out quick. Unfortunately this can come back and bite you in many ways. There is a long list of problems you could experience, including incorrect curing, a brittle job that can crack, peroxide bleed-through on the finished paint job and increased bubble chances, just to mention a few.
When I am giving a clinic on infrared curing, one of my suggestions is to use infrared all the way through the process. In fact I go further and say to use infrared on the panel before you apply the very first product. That’s body filler in most cases.
Doing this removes any chance of moisture causing an adhesion problem at a later date and the added heat also helps the product work properly.
I am only talking about a two-minute application of infrared, costing less than one cent. This can avoid so many problems and costs. For example, the shop doesn’t use infrared on the filler, but does use it on the primer. All of a sudden, they see something starting to lift or bubble and blister on the primer surface. Moisture or air that’s trapped will expand when you heat it, and suddenly and the two-minute application I suggested starts to make sense. If the filler is going to react because it has air trapped in it, then at least you see it before getting into the more expensive part of the repair, top coat, etc.
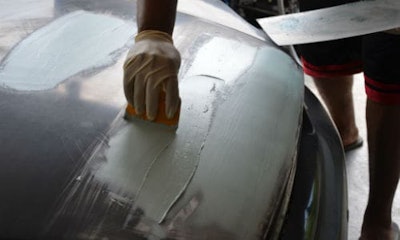
When mixing body filler try to spread it out, fold and repeat, rather than just stir in the hardener. Press the spreader to the palate to squeeze air bubbles out as you mix to avoid folding in air bubbles.
Also avoid using bits of cardboard as your mixing palette. Yes, most of have done this at one time or another, but it’s not a good idea. A lot of cardboard is treated to make it just a little waterproof. That treatment includes wax, which can be transferred into your filler and onto the paint job. The filler can also pick up fibres from the cardboard, which again can effect the quality of your paint job. Mixing palettes are not expensive and they’re worth the small expense.
The other scenario you might run into if you’re not using infrared is that the heated booth shows you the problem when the clear is baked. It might not even show you the problem there, though. The job could pass quality control and get handed back to the customer. At that point, the new paint job is sitting in the customer’s driveway and the sun delivers a large dose of infrared that exposes the underlying problem.
This can manifest itself in small micro-blisters, pinholing or even cause the filler to bulge. No matter how it manifests, it’s certainly going to be a re-do. That comes off your shop’s bottom line, not to mention the effect on your reputation.
Body fillers can be treated with varying temperatures depending on the manufacturer. There are even variations between European and US brands. Here’s a really safe starting point: if you have temperature control, set it at a maximum of 48.8º C (120º F). This may be increased in some cases, but first check the product instructions you get from the manufacturer of the body filler.
You can also control temperature using distance. However I can only give you advice on B-TEC units, as all infrared units will have distance, power and wavelength variations. Our units are normally used at 24-inches from the panel. If you don’t have our temperature controlled version, pull it back to 36-inches and bake on full for around six minutes and allow it to cool before sanding. Another option is keeping the 24-inch distance, but only run on half-power for approximately seven minutes.
It’s all about building on a firm foundation. There is no point using great paint systems if the products underneath it fail.
I hope you found this article useful and it helps you avoid some of the common slip-ups found when using body filler. If you have any questions or require advice about infrared, please contact me via email to p.phillipson@bullshoals.net.